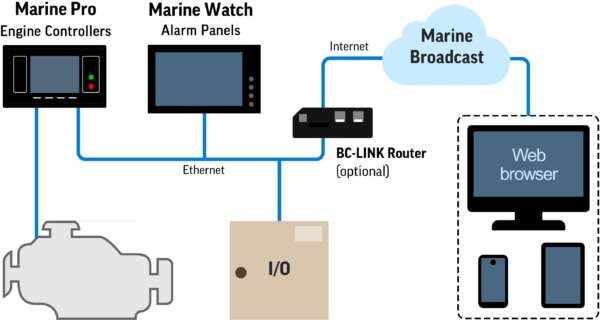
Marine Broadcast is Auto-Maskin’s cloud-based monitoring service, giving users on any remote device with a standard web browser, such as Chrome, Edge, or Firefox, access to alarm lists and channel data from connected vessels.
This article covers everything you need to get Marine Broadcast up and running on your vessel.
In Marine Broadcast a Vessel represents the ship itself, while a System is an individual Auto-Maskin unit installed on that vessel (for example S-ONE, LT-ONE, or DCU 210E/410E).
Compatible Systems
Marine Broadcast is supported on the following products:
| Product | Minimum Software Version |
|---|---|
| Marine Watch S-ONE | 2.00 Patch 1 or later |
| Marine Watch LT-ONE | 3.11 Patch 5 or later |
| Marine Pro DCU 210E / 410E | 3.11 Patch 5 or later |
1. Registering Company, Vessels and Systems
Each System needs to be registered in the Marine Broadcast service along with the Vessel it is installed on and the Company it belongs to.
Before you begin, have the following ready:
- Company name and contact details
- Vessel name(s)
- Serial number of each System to be registered
Step 1 – Register your Company
Submit the Company Registration form:
Step 2 – Register your Vessel(s) and System(s)
After submitting the Company Registration form, register one or several Vessels – each with one or more Systems – through the Vessel Registration form. Additional Vessels and Systems can be added through the same form later on.
What happens after registration?
Auto-Maskin provisions your Company, creates an Company Administrator account, and configures the registered Vessels and Systems in the Marine Broadcast service.
The Company Administrator can then create additional user accounts from within the Marine Broadcast web application.
2. Network Requirements
The panel initiates outbound connections to the cloud server. No static public IP or port forwarding on the vessel is required.
Ensure the following outbound ports are open on the vessel’s network:
| Port | Protocol | Purpose | Applies to |
|---|---|---|---|
| 8883 | TCP | Secure MQTT (vessel to cloud) | All products |
| 123 | UDP | NTP time synchronisation | DCU 210E / 410E, LT-ONE |
If the vessel does not have a wired Ethernet connection to the Internet, the BC-LINK Router (P/N 1501555) can be used to provide connectivity over cellular networks.
Checking software version
You can check the software version in the panel’s menu or web interface:
| Product | Menu Section |
|---|---|
| Marine Watch S-ONE | Menu -> Administration -> This Panel |
| Marine Watch LT-ONE | Menu -> Help -> Version Information |
| Marine Pro DCU 210E / 410E | Menu -> Help -> Version Information |
3. Installation on vessel
How to connect – Marine Watch S Series (S-ONE)
Prerequisites
- S-ONE Alarm Panel with software 2.00 Patch 1 or later.
- A router or network switch with Internet connectivity (e.g. satellite internet, LTE router, or onboard Wi-Fi).
Step 1 – Connect to Internet
Connect a network cable to the Ethernet 2 (Eth2) port on the S-ONE Alarm Panel. Connect the other end to a router or switch with Internet access.
Step 2 – Configure Internet Access
On the S-ONE, open Main Menu -> Administration -> This Panel -> Network and configure the Ethernet 2 IP Address and Gateway. The Ethernet 2 IP address must be on the same subnet as the Gateway.
Contact the network administrator if unsure about the gateway configuration.
Step 3 – Enable Broadcast
On the S-ONE, go to Main Menu -> Administration -> System -> System Setup. Find Marine Broadcast and set it to Enabled.
Step 4 – Verify
On the S-ONE, open Main Menu -> Troubleshooting -> Broadcast. The status should show Connected.
Then sign in to Marine Broadcast at broadcast.auto-maskin.com and confirm the Vessel loads and updates with Live Data and Alarm List.
How to Connect – Marine Pro / Marine Watch LT Series (DCU 210E / 410E / LT-ONE)
Prerequisites
- DCU 210E, DCU 410E, or LT-ONE with software 3.11 Patch 5 or later.
- A router or network switch with Internet connectivity.
- A computer or laptop connected to the same network as the unit (for web interface access).
Step 1 – Connect to Internet
Ensure that the Ethernet port on the unit is connected to the Internet.
Step 2 – Configure Internet Access
On the unit, configure the IP Address and Gateway in the Administrative part of the unit’s web interface. To access the web interface, open a browser on a computer on the same network and enter the unit’s IP address.
Contact the network administrator if unsure about the gateway configuration.
Step 3 – Enable Broadcast
Enable the Broadcast functionality either in the unit’s web interface or in the Administrative part of the menu system.
Step 4 – Verify
On the unit, check the Broadcast status – it should show Connected.
Then sign in to Marine Broadcast at broadcast.auto-maskin.com and confirm the Vessel loads and updates with Live Data and Alarm List.
What You’ll See
Once a System is connected and transmitting, you can monitor it from your favorite browser at at broadcast.auto-maskin.com.
- Dashboard – Overview of all company vessels and their connection status.
- Alarm List – Current alarms and warnings from the vessel, updated on change.
- Live Data – Channel data from the vessel, updated every 20 seconds.
- Graphs – View historical channel data plotted over time (up to 7 days).
- Data Export – Export historical channel data and alarm list changes as CSV files for use in spreadsheet software (up to 30 days).
- Notifications – Company Administrators can configure SMS and email notifications for alarm events and connection changes.
For detailed information on using the Marine Broadcast web application, see the Marine Broadcast User Manual under the product page’s “Documentation”-tab.